We live in an age where
more and more devices are being web enabled; be it your TV, mobile
device, tablet or laptop for instance. This makes quality wireless
coverage more important than ever. While routers are becoming better and
more having more features allowing them to deliver higher speeds over a
greater area, a lot of people on the consumer level still use the
standard router provided by their ISP; me included. There is obviously
no problem with this but sometimes it may not achieve complete coverage
of your house and can receive interference.
There
are alternatives to wireless such as power line networking. This uses
your mains wiring around your house to carry the internet signal and is
great at delivering high speed through wired connections. These are
great and work fine unless you are wanting to use a tablet or mobile
phone which have the obvious problem that they lack an Ethernet port.
So what is the solution for people wanting to use wireless but still
want the speed that powerline delivers?
Enter the
Netgear WN1000RP WiFi booster.
This small device is designed for boosting the signal put out by your
router, therefore extending its theoretical range and speeds in previous
wireless dead zones.
Build and Aesthetics:
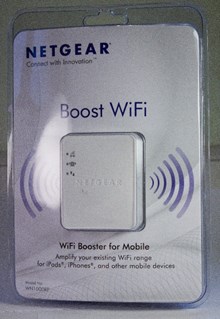
The
booster comes in a rather large, ‘easy to open’, clam shell packaging
given the size of the device. Having lost a few fingers attempting to
open the packaging, I finally did manage to get to the product inside.
The box contains the device itself, a small installation guide and
various other pieces of paper.
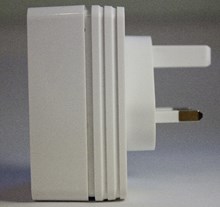
The
device follows the general Netgear styling and is very similar to their
power line networking kits. It is constructed with a solid feeling and
glossy white plastic with the ‘Netgear’ name embossed on the front. Size
wise, the booster is no larger than a standard plug in both height and
width. This means that it won’t obstruct any sockets to the side of it,
whether it is plugged into a wall socket or an extension. On the bottom
is a small pin hole ‘Factory Reset’ button as well as a small hole for
passive cooling. There are 3 indicator LEDs on the front of the device.
The top one is the ‘Link rate’ LED. This indicates that there is a
connection between the booster and the router. Below that is the
‘Status’ LED. This indicates that the device is powered on. Lastly is
the ‘WiFi Device to Booster’ LED. This indicates that the booster is
connected to a device or PC. On the side of the booster you find an
on/off button and a WPS button. See later in the article for details on
the WPS button.
The Setup:
I
am no networking expert, therefore I can look at the setup from a
beginner’s perspective. This is useful as a device like this should be
easy to setup no matter the users background knowledge may be. The setup
in theory is very simple, however in practice, some questionable
wording in the manual and un-cooperative routers can make it slightly
challenging at times.
The
first step in the setup is the placement of the extender. Netgear
recommend that you place the extender halfway between the device you
want to connect to and the router, but as was the case for me, this was
not possible. This simply meant that I had to move the booster slightly
closer to the router. This was the simple part. Once plugged in, the
status LED blinked orange before turning solid green. This indicated
that the booster was ready to go.
There
are two ways of setting up the router, both of which can be done either
on a PC or directly on your mobile device. The first way is the most
basic and the second is more complicated. I will cover the first method,
first. As I mentioned before, the booster has a WPS button. This is a
mainly automated process. If your router supports it and has a WPS
button also, simply press the WPS button on the router and then press
the WPS button on the booster within two minutes of each other. Having
done this, the lights on the booster will start blinking, indicating
that it is connecting. When the LEDs turn back solid, the booster is
ready to connect to and will show up in the regular scan with ‘EXT’ on
the end of your network name. For example; if your network was called
“NetgearWN1000RP”, it will now be called “NetgearWN1000RP_EXT”. Connect
to the EXT one and enter the WiFi password as you would have done. In
theory, this should work fine and will get you up and running in no
time. The problem I had with this using the BT HomeHub was that it would
extend the public “BTOpenZone” network and not our private network.
This meant that I had to perform the manual setup. A process that is a
little more complex if you are new to networking but it is nothing too
complicated.
Connecting
manually is easy once you know how but takes a little longer. As the
device is designed with mobile devices in mind, I used an iPad to
configure the network. Firstly, once the device is powered, you have to
search for the WiFi networks as you would normally. Having searched, you
should see a device called “NETGEAR_EXT”. This is the extender and is
the one you want to connect to. If you’re on an Apple device as I was,
this will open the browser which allows you to configure the network. If
you’re on a laptop, open your web browser and you will be re-directed
to the setup page. (If it does not automatically redirect you, go to
www.mywifiext.net).
From here, it is simple and you just follow the steps through. First
you select your router’s name in the list of networks close, enter your
router’s existing password, the booster will then configure the network
and you’re done. In order to connect to the booster, search for WiFi
networks in your device settings and connect to the EXT network. The
password will be the same as your router’s password. When your device is
connected, the WiFi device to booster LED will be lit.
Testing Methodology and Results:
The
best way I found to test the booster in the real world was using
practical experiments. In order to test the range I am going to use an
iPad and the SpeedTest app by Ookla. I tested using the exact same
server each time. I am going to first test the speed of the connection,
some distance away from the router, without the booster, and test the
speed of the connection. I will then stand in the exact same place with
the booster midway between me and the router and test again and compare
the results.

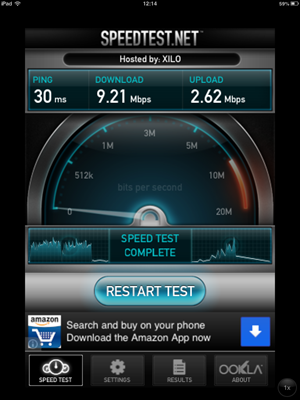
The
first screenshot (above) shows the test without the booster. I am stood
around ten meters away from the router with around six walls between
myself and the router. My Apple device showed that I had two out of
three bars of signal so whilst I was still in range of the router, the
signal had dropped slightly in quality. As you can see from the results,
I achieved 9.21Mbps download and 2.62Mbps upload. This isn’t bad by any
means but the WiFi, under ideal conditions is usually around 15Mbps so
you could notice a difference when transferring large files over a
network or streaming in high definition through services such as Netflix
for example.

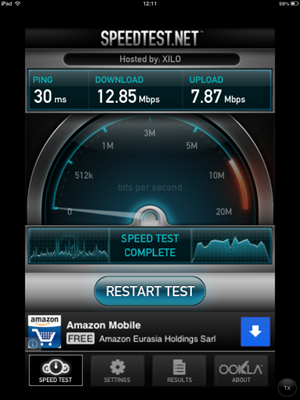
This
second screenshot (above) shows the test performed using the booster.
As you can see, I achieved 12Mbps down and 7Mbps up. The booster was
placed approximately between me and the router. The results may not look
like a huge improvement but it is an improvement nonetheless. There is a
big difference between the upload speeds and a 3Mbps difference in
download speeds. This brings the speed closer to what I usually see when
I am stood in the same room as the router. You may be questioning
whether it is worth buying the booster when you may only see a small
increase in speeds however, if you have a router which doesn’t cover
your entire house or you experience dead zones around your house where
there is no signal at all, you will definitely need this. I was limited
when testing as my router covered the entire area of my house and
surrounding area. Even so, the results show that it still made a
difference when moving further from the router.
More
practically, when testing with TV streaming services such as 4OD and
iPlayer, I was free to move around the house without a loss of bandwidth
or stuttering in places where I experienced it before. This will
benefit you on devices such as your phone so you can walk around and not
worry about losing connection. The booster also boosted the signal
across my garden and improved the signal quality in my garage.
In Summary:
The
Netgear WN1000RP
does exactly what it says on the tin. It takes your WiFi signal and it
boosts it. It doesn’t try to do anything extra and fancy. It just does
exactly what you want it to and it does it well. The ‘Link Rate’ LED is
great as it gives you a visual indication of the signal strength which
aids you when placing the booster in order to get the best results. The
device doesn’t produce much heat and is completely silent. It just does
its thing and doesn’t get in the way. It is something you can plug in,
hide it away behind the TV and forget about or keep it on show as it is
in no way ugly. One thing to bare in mind; the booster is designed for
mobile devices so whilst your laptop and what not will work fine
connected to it, you may not see the high speed performance you would
see from a more expensive booster. The setup was relatively easy for me
and I have no experience with a device such as this. I managed to work
out how to do it using the manual once I had read through it a few times
which means your grandma could probably set it up. The
WN1000RP
is very affordable at only £35.90 and is great for eliminating those
dead spots around your house. A recommended buy for anyone in this
situation.
The product page can be found
here.


This comment has been removed by the author.
ReplyDeleteVery Well Written article. Full of useful information. These kinds of articles attract people. You did a great job. I m pleased with your and thankful for such a wonderful article.
ReplyDeleteThis comment has been removed by the author.
ReplyDeleteSavaliya Oil Maker Machine for Home Usage. This Product is Easy to Use and it produces health oil for your family. There are also some other products of savaliya industry, like coconut oil maker machine, peanut oil maker machine, sesame oil maker machine. for more info please refer this link - https://www.savaliyaoilmaker.com
ReplyDeleteSMS Marketing, at https://smssquad.com/ We provide bulk branded
ReplyDeleteSMS Marketing services.It is amazing and wonderful site TO visit
Keytexmachines is leading vmc machine job work India With Excellent Quality, Cost Effective Price & Prompt Delivery. CNC Machining Job Work, CNC Turning Job Work, CNC Machine Service offered by Keytex machines, Surat.
ReplyDelete